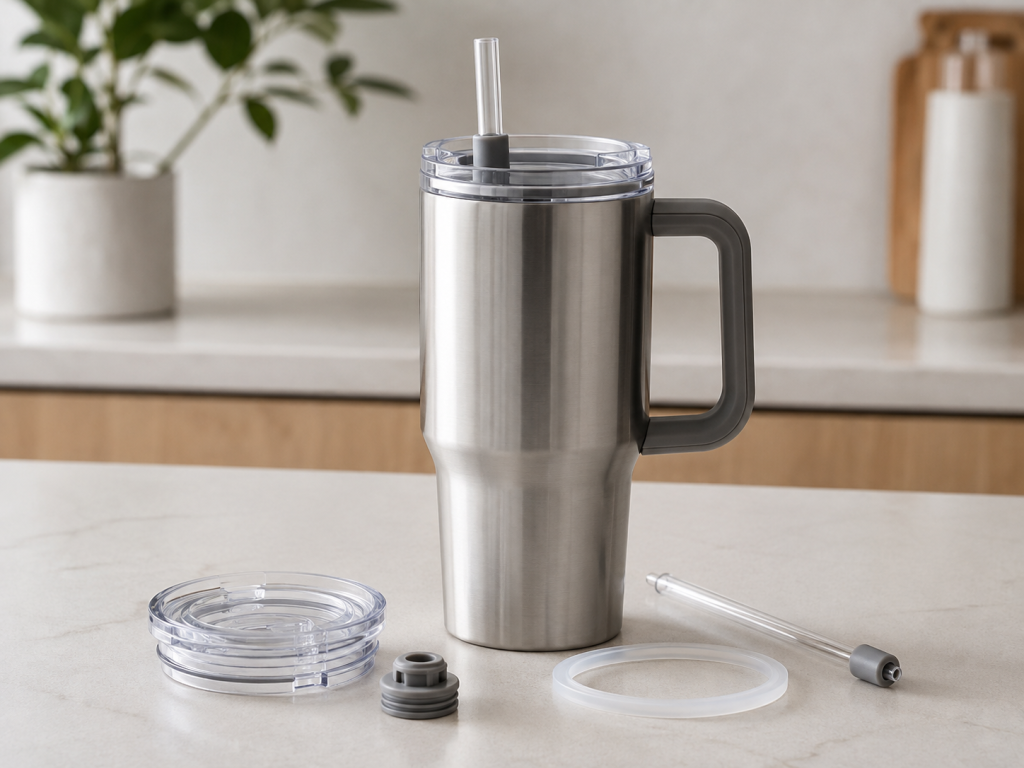
A tumbler lid may look like a simple plastic component, but in reality it is a small mechanical system.
A typical lid can include multiple parts:
- Main plastic lid body
- Silicone gasket
- Straw opening
- Straw seal
- Sliding or rotating closure
- Handle
- Vent structure
- Silicone valve
- Plastic insert
- Decorative components
If any one of these components is poorly designed, the finished tumbler may leak, feel difficult to use, create assembly problems, or fail during repeated opening and closing.
For drinkware brands, OEM buyers, importers, and private-label projects, tumbler lid development should therefore consider sealing, drinking experience, injection molding, assembly, materials, tolerances, and cleaning from the beginning.
This guide explains the main factors involved in developing a custom tumbler lid for mass production.
Why Tumbler Lid Design Matters
The lid is one of the most frequently handled parts of a reusable tumbler.
Consumers may open, close, remove, wash, rotate, slide, or carry it many times every day.
A successful lid should balance:
- Leak prevention
- Easy drinking
- Smooth operation
- Secure fit
- Easy cleaning
- Comfortable handling
- Attractive appearance
- Reliable mass production
- Reasonable component cost
These requirements often conflict with each other.
For example, increasing gasket compression may improve sealing but can make the lid difficult to install or remove.
Making a straw hole very tight may reduce leakage around the straw but increase insertion force.
Good product development therefore requires the entire lid system to be evaluated together.
1. Start with the Tumbler Interface
Before designing the lid, the first step is to understand how it connects to the tumbler body.
Common interfaces include:
- Threaded lids
- Press-fit lids
- Push-on lids
- Snap-fit structures
- Bayonet-style locking systems
Important dimensions may include:
- Cup opening diameter
- Thread dimensions
- Wall thickness
- Sealing surface diameter
- Rim geometry
- Lid insertion depth
- Engagement length
Even small dimensional differences can significantly affect fit and sealing.
For custom projects, it is best to provide the manufacturer with:
- Tumbler drawing
- 3D CAD file
- Physical cup sample
- Existing lid sample, if available
2. Tumbler Lid Sealing Systems
A lid normally requires an elastomer seal between the plastic lid body and the tumbler.
Silicone is commonly used because it offers flexibility, resilience, color options, and suitability for repeated washing.
Common sealing structures include:
- Silicone O-rings
- Flat gaskets
- Lip seals
- Custom-profile sealing rings
- Overmolded silicone seals
The ideal structure depends on the cup geometry and installation method.
3. Silicone Gasket Compression
A silicone gasket needs sufficient compression to maintain contact with the cup sealing surface.
Too little compression may result in:
- Leakage
- Loose lid fit
- Inconsistent sealing
Too much compression may result in:
- Difficult installation
- High removal force
- Gasket deformation
- Accelerated compression set
- Gasket rolling or twisting
The correct compression should be determined by:
- Gasket cross-section
- Silicone hardness
- Groove dimensions
- Cup tolerance
- Lid tolerance
- Sealing pressure
Prototype testing should be performed with actual production-intent components.
4. Gasket Groove Design
A gasket groove controls where the silicone seal sits and how it deforms.
Important variables include:
- Groove width
- Groove depth
- Corner radius
- Retention features
- Compression allowance
- Expansion space
A groove that is too narrow may pinch the gasket.
A groove that is too wide may allow movement or twisting.
The gasket should remain stable during lid installation, removal, washing, and repeated use.
5. Preventing Gasket Loss
A common consumer complaint is a silicone sealing ring falling out during washing.
This can be reduced through:
- Retention lips
- Controlled groove geometry
- Interference features
- Custom-profile gaskets
- Integrated overmolding
However, the seal must still be removable if the product is designed for consumer cleaning.
This creates a balance between secure retention and serviceability.
6. Straw Opening Design
Straw-based tumblers require careful design around the straw opening.
The structure may include:
- Open straw hole
- Silicone straw seal
- Flexible valve
- Rotating straw cover
- Sliding closure
- Detachable straw insert
The correct design depends on whether the product is intended to be:
- Splash resistant
- Spill resistant
- Leak resistant
- Fully closed for transport
A tumbler with an open straw generally cannot be treated the same way as a fully sealed bottle.
Product claims should match actual testing and design capability.
7. Silicone Straw Seals
A silicone straw seal can help reduce liquid movement around the straw.
Important design factors include:
- Straw outside diameter
- Seal hole diameter
- Silicone hardness
- Seal thickness
- Lip geometry
- Installation direction
If the seal is too tight:
- Straw insertion becomes difficult
- Friction increases
- The seal may deform
If the seal is too loose:
- Liquid may escape around the straw
- The straw may feel unstable
Prototype fit testing is therefore important.
8. Straw Diameter and Compatibility
Do not assume that all reusable straws have the same diameter.
Possible straw materials include:
- Stainless steel
- PP
- Tritan-type plastics
- Silicone
Different projects may also use straight or bent straws.
Before tooling, specify:
- Outside diameter
- Wall thickness
- Straw length
- Material
- Tolerance
If one lid is expected to support several straw sizes, the seal structure should be evaluated accordingly.
9. Air Vent Design
When a user drinks through a straw, air must enter the tumbler to replace the liquid volume.
Without sufficient venting, the user may experience:
- High suction resistance
- Interrupted liquid flow
- Lid deformation
- Uncomfortable drinking
Vent features can include:
- Small vent holes
- Silicone valves
- Molded air channels
- Integrated vent structures
The vent should allow airflow without unnecessarily increasing leakage risk.
10. Sliding Closures
Many tumbler lids use a sliding drinking closure.
Sliding components should be evaluated for:
- Smooth movement
- Opening force
- Closing force
- Wear
- Cleaning
- Liquid trapping
- Assembly
- Retention
Plastic-to-plastic sliding surfaces require suitable tolerances.
If silicone seals are used beneath the slider, friction must also be considered.
A closure that feels smooth in an early prototype may behave differently after repeated washing or dimensional variation in production.
11. Rotating Lid Mechanisms
Some designs use rotating discs or multi-position drinking covers.
These may allow:
- Straw drinking
- Direct drinking
- Closed position
Rotating mechanisms require careful control of:
- Detents
- Friction
- Alignment
- Seal contact
- Component retention
The mechanism should provide clear user feedback when switching positions.
12. Handle Design
Handles are increasingly common on large-capacity tumblers.
A handle may be:
- Integrated into the lid
- Molded as part of the cup body
- Separate injection-molded component
- Attached through mechanical assembly
For lid-integrated handles, engineering factors include:
- Grip space
- Wall thickness
- Rib structure
- Load direction
- Stress concentration
- Attachment points
Handle geometry should also consider how the tumbler will be carried when full.
13. Handle Material Selection
Handles are commonly molded from rigid thermoplastics.
Possible materials depend on product requirements and may include:
- PP
- PC
- Other suitable engineering plastics
Material selection should consider:
- Strength
- Impact resistance
- Temperature
- Chemical exposure
- Food-contact requirements
- Appearance
- Cost
The handle and lid body do not always need to use the same plastic.
14. PP vs PC for Tumbler Lid Components
Plastic selection is an important part of lid development.
PP
Polypropylene is commonly considered for drinkware components because it can offer:
- Low density
- Good chemical resistance
- Good molding performance
- Competitive cost
- Flexible design options
PC
Polycarbonate can provide:
- High stiffness
- Good impact resistance
- Transparent appearance in suitable grades
- Strong structural performance
The correct material depends on the actual product requirements, regulatory expectations, appearance, and processing conditions.
Specific food-contact compliance should be verified for the selected resin grade.
15. Transparent Lid Design
Transparent lids create additional appearance requirements.
Potential issues include:
- Flow marks
- Weld lines
- Sink marks
- Scratches
- Gate marks
- Ejector marks
- Mold-polish quality
Part geometry and gate location become particularly important for transparent components.
A design that works mechanically may still need modification to achieve acceptable cosmetic quality.
16. Injection Molding Wall Thickness
Plastic lid parts should use reasonably consistent wall thickness wherever possible.
Large thickness transitions can lead to:
- Sink marks
- Warpage
- Uneven cooling
- Longer cycle time
- Dimensional variation
Instead of simply increasing wall thickness for strength, designers can use:
- Ribs
- Gussets
- Local reinforcement
- Curved structures
This can improve strength while reducing unnecessary material.
17. Draft Angles
Injection-molded components normally require draft to support mold release.
Insufficient draft may cause:
- Difficult demolding
- Scratches
- Drag marks
- Part deformation
- Increased ejector force
Textured surfaces may require additional draft.
Draft should be considered early during DFM rather than added after the cosmetic design is complete.
18. Undercuts and Tooling Complexity
Complex lid designs may contain:
- Snap hooks
- Internal threads
- Side holes
- Locking features
- Hidden grooves
These features can require:
- Slides
- Lifters
- Unscrewing mechanisms
- Collapsible cores
- Additional mold actions
Tooling complexity directly affects:
- Mold cost
- Maintenance
- Cycle time
- Production stability
Simplifying unnecessary undercuts can reduce both tooling cost and long-term manufacturing risk.
19. Snap-Fit Design
Snap fits are often used to assemble lid components without screws.
They may connect:
- Handles
- Sliders
- Decorative inserts
- Straw components
- Retainers
Snap-fit geometry must provide enough retention without cracking during assembly.
Important variables include:
- Hook length
- Deflection
- Material
- Wall thickness
- Engagement depth
Assembly testing should be repeated across tolerance extremes.
20. Plastic and Silicone Assembly
Many tumbler lids combine rigid plastic and flexible silicone.
Common combinations include:
- Plastic lid + silicone gasket
- Plastic slider + silicone seal
- Plastic straw port + silicone valve
- Plastic handle + silicone grip
These parts may be joined through:
- Mechanical assembly
- Insert molding
- Overmolding
- Press fitting
The manufacturing method should be selected based on geometry, production volume, maintenance needs, and target cost.
21. Silicone Overmolding
Overmolding can integrate silicone directly onto a rigid substrate.
Possible benefits include:
- Reduced loose components
- Improved grip
- Integrated sealing features
- Cleaner appearance
- Simplified final assembly
However, overmolding requires evaluation of:
- Material bonding
- Insert positioning
- Tooling structure
- Mold temperature
- Part deformation
- Bonding surface geometry
Mechanical interlocking features may be required depending on the material combination.
22. Leakage Paths to Review
When troubleshooting a leaking lid, inspect every possible path rather than only the main gasket.
Potential leakage paths include:
- Lid-to-cup gasket
- Straw opening
- Drinking opening
- Vent hole
- Slider
- Rotating mechanism
- Component joints
- Thread interface
Sometimes tightening the main gasket does nothing because the actual leak occurs through the vent or straw seal.
23. Leak Testing
Testing should reflect the intended use of the product.
Possible evaluations include:
- Static inversion
- Tilting
- Shaking
- Splash testing
- Pressure-related testing
- Repeated open/close cycling
- Temperature cycling
The acceptance criteria should be defined before mass production.
A straw tumbler and a fully sealed travel bottle may require different test methods.
24. Tolerance Stack-Up
A lid is an assembly of multiple molded components.
Each part has manufacturing tolerance.
For example:
Cup diameter tolerance
- lid-body tolerance
- gasket tolerance
- groove tolerance
Together, these determine final sealing compression.
This is called tolerance stack-up.
Ignoring stack-up can produce a prototype that works perfectly but inconsistent mass-production results.
Critical fit dimensions should therefore be reviewed as a complete assembly.
25. Cleaning and Hygiene
Drinkware products require frequent cleaning.
The lid should avoid unnecessary areas where liquid can remain trapped.
Review:
- Deep blind grooves
- Narrow channels
- Hidden cavities
- Difficult-to-remove seals
- Inaccessible slider structures
Where possible, components should be designed for easy disassembly and cleaning.
The exact cleaning requirements depend on the target market and product positioning.
26. Dishwasher Considerations
If dishwasher use is expected, materials and geometry should be evaluated for repeated exposure to:
- Heat
- Detergent
- Water
- Drying cycles
Possible concerns include:
- Warpage
- Color change
- Seal aging
- Dimensional change
- Component loosening
Do not assume dishwasher suitability based only on the general material family.
Testing should be performed on the finished components.
27. Surface Finish and Texture
Tumbler lids often combine functional and cosmetic surfaces.
Possible finishes include:
- High gloss
- Matte
- Mold texture
- Fine grain
- Transparent polish
Texture can affect:
- Appearance
- Grip
- Scratch visibility
- Mold release
- Cleaning
Texture specifications should be confirmed before mold fabrication.
28. Color Matching
Plastic and silicone components can be developed in coordinated colors.
However, matching silicone and plastic exactly can be challenging because the two materials interact with light differently.
Color appearance may vary because of:
- Gloss
- Texture
- Thickness
- Transparency
- Resin formulation
Physical approval samples are recommended before mass production.
29. Branding Options
Custom tumbler lids can include brand identity through:
- Molded logos
- Embossed logos
- Debossed logos
- Printing
- Laser marking
- Color inserts
Branding should be considered during tooling design so it does not interfere with:
- Sealing
- Grip
- Structural ribs
- Assembly
30. Prototype Testing Before Production
Before committing to high-volume tooling, validate the lid system.
Recommended checks include:
- Lid installation
- Removal force
- Gasket retention
- Leakage
- Straw insertion
- Drinking flow
- Venting
- Handle strength
- Slider operation
- Rotation
- Cleaning
- Assembly
- Appearance
Repeated-cycle testing can reveal problems that are not visible during first-use testing.
Common Tumbler Lid Problems
Lid Leaks Around the Rim
Possible causes:
- Insufficient gasket compression
- Incorrect gasket hardness
- Groove dimension issue
- Cup dimensional variation
- Twisted gasket
Leakage Around the Straw
Possible causes:
- Straw hole too large
- Seal too soft
- Poor lip geometry
- Incorrect straw diameter
Drinking Through the Straw Feels Difficult
Possible causes:
- Insufficient venting
- Vent valve too stiff
- Straw restriction
Slider Is Too Tight
Possible causes:
- Excessive interference
- Plastic warpage
- High seal friction
- Tolerance stack-up
Slider Becomes Loose
Possible causes:
- Wear
- Insufficient retention
- Dimensional variation
- Material creep
Handle Feels Weak
Possible causes:
- Thin structure
- Poor rib design
- Stress concentration
- Weak attachment geometry
Custom Tumbler Lid Development Process
A typical OEM/ODM project may follow these steps.
Step 1: Requirement Review
Provide:
- Tumbler drawing
- Cup sample
- Lid concept
- Capacity
- Target functions
- Expected volume
Step 2: Engineering and DFM
Review:
- Seal structure
- Straw system
- Venting
- Plastic thickness
- Snap fits
- Handle structure
- Moldability
Step 3: Prototype Development
Produce prototypes to evaluate:
- Fit
- Appearance
- Ergonomics
- Mechanism
Step 4: Tooling
Develop molds for:
- Plastic components
- Silicone seals
- Other molded parts
Step 5: Sampling
Check:
- Dimensions
- Assembly
- Leakage
- Appearance
- Function
Step 6: Validation
Perform project-specific testing before final approval.
Step 7: Mass Production
Proceed with molding, inspection, assembly, packaging, and shipment.
What to Send Your Tumbler Lid Manufacturer
For an efficient engineering review and quotation, provide:
- 2D drawings
- 3D CAD files
- Physical tumbler sample
- Existing lid sample
- Cup opening dimensions
- Target plastic material
- Silicone requirements
- Straw dimensions
- Leak-resistance requirements
- Handle requirements
- Colors
- Branding
- Order quantity
- Annual demand
- Testing requirements
- Packaging requirements
If the design is still at the concept stage, the manufacturer can review manufacturability before tooling.
Custom Silicone and Plastic Tumbler Components
SiliconeTumblerAccessories supports custom development of silicone and plastic drinkware components, including:
- Tumbler lids
- Silicone lid gaskets
- Straw seals
- Silicone valves
- Straw accessories
- Tumbler handles
- Silicone boots
- Silicone sleeves
- Plastic inserts
- Silicone + plastic assemblies
- Overmolded components
OEM/ODM support can include:
- DFM review
- Material selection
- Mold development
- Silicone molding
- LSR molding
- Plastic injection molding
- Overmolding
- Assembly
- Inspection
- Custom packaging
For a custom tumbler lid project, sending the actual cup together with 2D/3D files and functional requirements can significantly improve engineering evaluation and quotation accuracy.
FAQ
What material is commonly used for tumbler lids?
PP and other suitable plastics are commonly considered for rigid lid components, while silicone is widely used for gaskets, valves, and flexible sealing elements. The final material should be selected according to structure, performance, regulatory requirements, and target market.
How can I make a tumbler lid more leak resistant?
Review all possible leakage paths, including the cup gasket, straw opening, vent, slider, and component joints. Seal compression and manufacturing tolerances should also be validated.
Why does my tumbler leak around the straw?
Possible causes include excessive clearance around the straw, incorrect silicone seal geometry, dimensional variation, or insufficient sealing contact.
Can silicone be overmolded onto a plastic tumbler lid?
Yes, selected designs can use silicone overmolding, but plastic compatibility, bonding, mold structure, and processing conditions must be evaluated.
Can you make a custom lid from an existing tumbler sample?
Yes. A physical sample together with dimensions and functional requirements can be used as a starting point for custom lid development.
Do custom tumbler lids require separate molds for silicone and plastic parts?
Usually, separate tooling is required for different molded components, although the final tooling strategy depends on the product structure and manufacturing process.
Suggested SEO Title
Custom Tumbler Lid Design Guide: Seals, Straws, Handles & Leak Prevention
Suggested Meta Description
Learn how to design custom tumbler lids with silicone seals, straws, vents, handles and injection-molded plastic parts for reliable OEM drinkware production.
Suggested Tags
custom tumbler lid, tumbler lid manufacturer, tumbler lid design, silicone lid gasket, leak proof tumbler lid, tumbler straw seal, custom drinkware accessories, plastic tumbler accessories, tumbler handle manufacturer, tumbler lid injection molding, silicone tumbler seals, OEM tumbler accessories